How to Hang a Vinyl Banner the Right Way on Any Surface and Setting
You spent good money on a custom banner, anywhere from $50 for a basic 3×6 footer to $300+ for a large-format trade show display. The design looks sharp. The colors pop. And then you hang it up, and it looks like a wrinkled bedsheet someone forgot in the dryer. Or worse, you come back after a windy afternoon and find the whole thing on the ground with ripped grommets.
Here’s the thing: a vinyl banner is a durable, weather-resistant signage solution made from PVC (polyvinyl chloride), the same stuff in pipes and credit cards, but formulated as flexible sheeting, commonly used for outdoor advertising, trade show booth displays, and event promotions. But all that durability means nothing if the installation fails.
This guide covers every installation scenario you’ll actually face when you need to display a vinyl banner: indoor walls, outdoor fences, brick surfaces, ceiling suspension, and everything in between. Pop49 is a North American experiential marketing agency with over 30 years of experience in large-format printing and custom vinyl banner manufacturing, and we’ve seen every installation mistake imaginable. This is what actually works. Prices and product availability mentioned reflect typical 2024-2025 market conditions and may vary by region.
Essential Banner Hardware: What You Need Before You Start
Before you touch a ladder or drill, you need to understand your hardware options. The right hardware makes installation faster and results better. The wrong hardware guarantees frustration and a banner that looks worse than if you’d just leaned it against the wall.
Understanding Grommets and Grommet Spacing
Grommets are reinforced metal or plastic rings inserted along the edges of a banner that create sturdy attachment points for hanging hardware. The vast majority of commercial banners come with grommets already installed, typically in each corner and spaced every 24-36 inches along the edges.
Where should grommets be positioned for secure installation?
Grommets should be spaced every 2-3 feet (24-36 inches) along all edges for optimal tension distribution. This spacing prevents vinyl from sagging between attachment points and evenly distributes stress. For banners over 4 feet wide, intermediate grommets along the top and bottom edges are essential. Your vinyl banner size options directly affect how many grommets you need and where they should be placed. Corner grommets alone result in visible sagging within days.
Why every 2-3 feet specifically? Because vinyl stretches under tension. When grommets are 4+ feet apart, the material between them sags while attachment points bear all the stress, resulting in that wavy, unprofessional look and eventually torn-out grommets.
Flexible vs. Rigid Hardware Options
Your banner hardware falls into three categories:
Flexible options include bungee cords and rope, ideal for outdoor installations where wind absorption matters. Bungee cords provide flexible tension when hanging outdoor banners, absorbing wind stress while keeping the display taut. A 10-pack of 8-inch bungee cords runs $8-12 at Home Depot or Lowe’s. Solid-braid nylon rope (3/16″ diameter for banners up to 20 lbs) costs about $0.25-0.40 per foot.
Rigid options include screws, washers, and hooks, best for permanent indoor installations. Screw hooks (also called eye hooks) are metal hooks with a threaded screw end that create permanent anchor points. A 25-pack of #10 screw hooks costs $6-10.
Temporary options cover everything quickly and are removable. Zip ties (plastic strips with the locking head) run $5-8 for a 100-pack covering 6-8 installations. S-hooks (S-shaped metal hooks, 1-2 inches) cost about $8 for a 20-pack.
How much does vinyl banner hanging hardware cost?
A complete outdoor installation kit costs $27-42 total: bungee cords ($8-12), UV-resistant zip ties ($5-8), S-hooks ($6-10), and carabiner clips ($8-12). This handles 4-6 installations at roughly $5-10 per banner, compared to $50-150 to replace a banner damaged by inadequate hardware.
For trade shows, banner stands are portable display systems that hold vinyl banners upright without wall mounting. The Displays2go Economy Retractable ($45-65 on Amazon) works for 3-5 events. The Signworld Premium Roll-Up ($80-120) lasts 20+ events.
How to Hang a Vinyl Banner Indoors
Indoor banner installation is more forgiving than outdoor display. No wind, no rain, no UV damage degrading your vinyl at 5-8% per year. The goal is a flat, taut display that looks intentional.
Mounting on Drywall and Plaster Walls
For permanent wall mounting, screws with washers are your best bet. The washers distribute pressure across a wider area so the grommet doesn’t pull through under the banner’s weight (typically 0.5-1.5 lbs per square foot for standard 13 oz vinyl).
The process takes 15-25 minutes for a standard 3×6-foot banner:
- Measure the distance between your grommets
- Mark the wall positions with painter’s tape, double-checking the level
- Drill pilot holes or install drywall anchors (Toggler brand, $6 for 20 at Home Depot) for walls without studs
- Install #8 or #10 screws with 3/4″ washers behind the grommets
- Work corner to corner diagonally, pulling the banner taut as you go
For lightweight banners under 2 lbs, Command Large Picture Hanging Strips ($8-12 at Target) work for a temporary indoor display. But here’s an honest take: Velcro looks great for the first 3-4 weeks, then starts peeling, especially in humid environments. If your banner needs to stay up more than a month, use actual hardware.
Suspending Banners from Ceilings
Ceiling-hung banners create visual impact in retail spaces and trade show booths. You’ll need aluminum banner hangers (Quartet Adjustable, $15-25 at Staples), which clamp the top and bottom edges to keep everything flat and wrinkle-free.
The suspension method depends on your ceiling type:
- Drop ceilings: Hook into the T-bar grid using ceiling grid clips ($5-8 for 10-pack), but note that grids only support 2-5 lbs per tile section
- Exposed ceilings: Use adjustable cable hangers or rope tied to the existing structure
- Finished ceilings: Requires screw-in eye hooks rated for your banner’s weight, plus a stud finder
Quick sidebar: I’ve seen $400 banners destroyed by forklifts in warehouses because someone hung them at 6 feet “for better visibility.” Hang ceiling banners at least 8 feet up.
Quick Setup for Trade Shows
Retractable banner stands are the gold standard for trade show booth displays: the banner rolls up inside the base, you pull it up and hook it to the support pole, done in 45-90 seconds per stand.
For banners that need to hang, bungee cords attached to your booth’s framework work perfectly and take 3-5 minutes per banner. For table banners, binder clips attached to a fitted tablecloth create a clean display without a permanent attachment, making it a 2-minute setup.
How to Hang a Vinyl Banner Outdoors
Outdoor installation is where things get real. You’re fighting wind (even 15 mph creates significant stress), rain, temperature swings of 30-50°F between day and night, and UV exposure that degrades vinyl 5-8% annually.
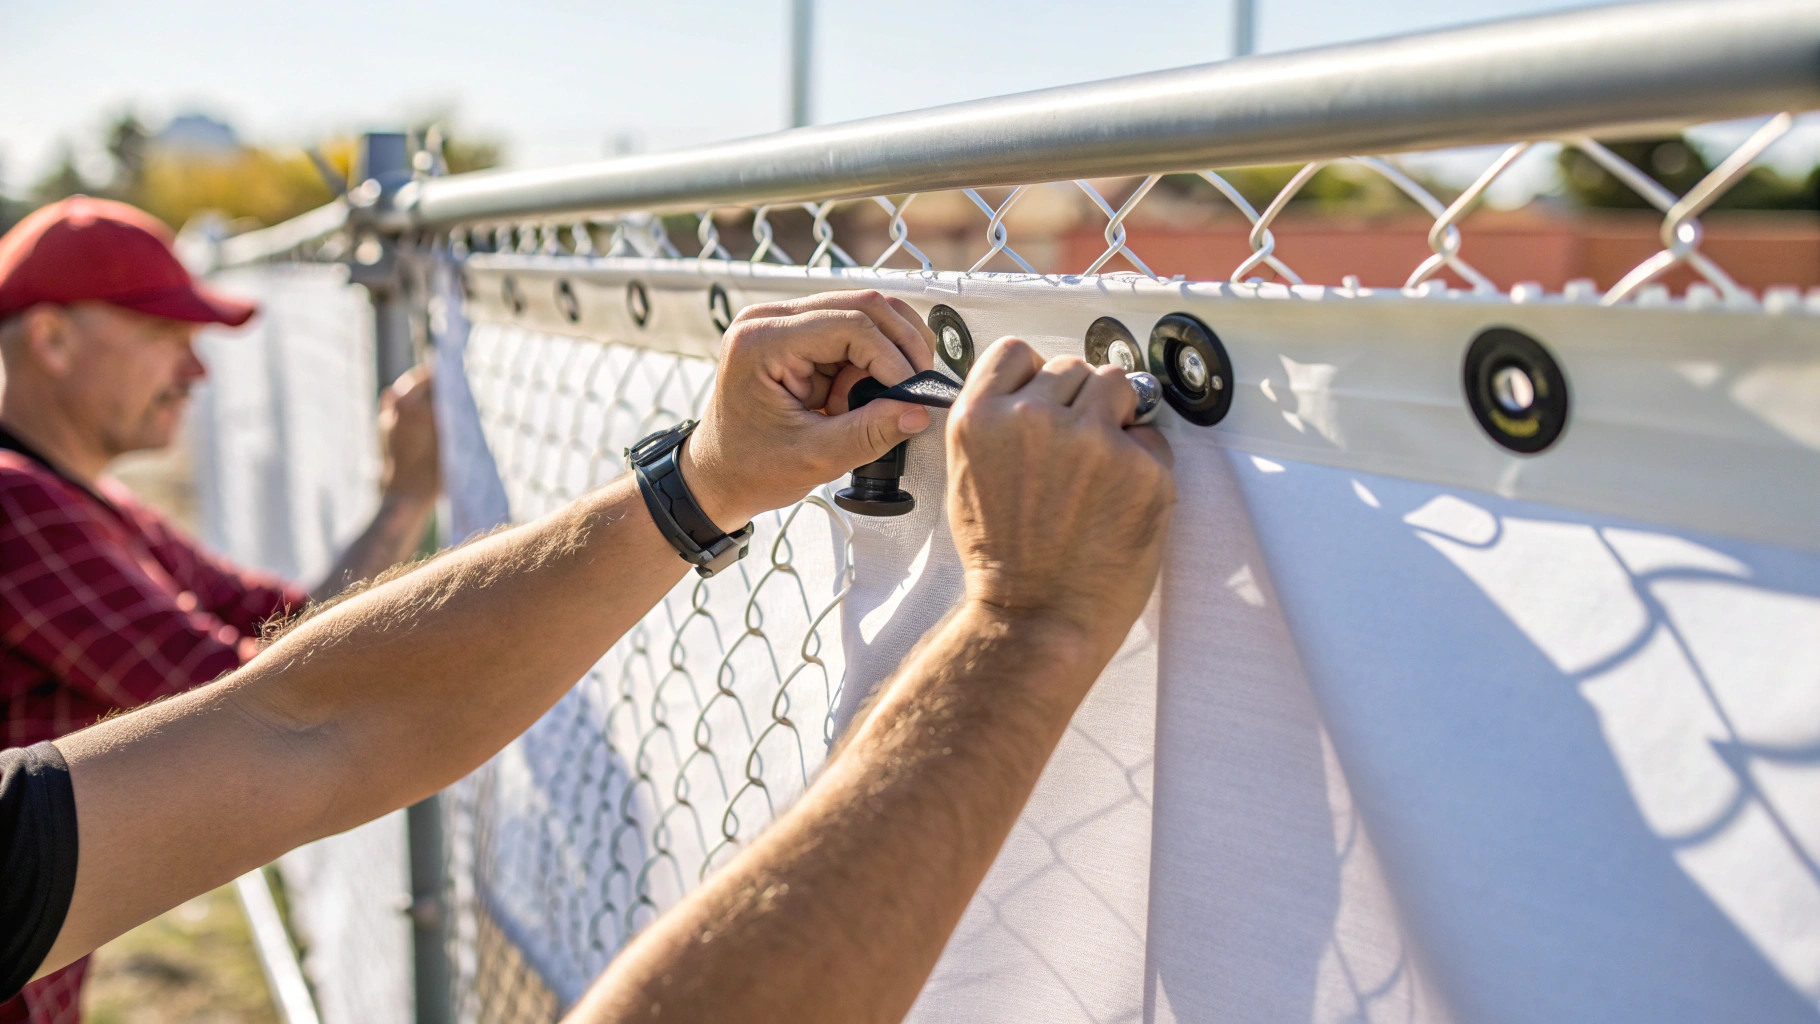
Attaching to Chain-Link and Solid Fences
Chain-link fences are the easiest outdoor surface because the fence structure itself creates dozens of attachment points. Feed zip ties through your grommets and around the fence wire, taking 2-3 minutes per grommet. Space zip ties at every grommet without exception. Skip even one, and you’ve created a stress point where the banner can tear in 20+ mph winds.
Use 8″ or 11″ UV-resistant zip ties (black, not white, since black resists UV degradation 3- 4x longer). The Commercial Electric 11″ Heavy Duty UV Black ($12 for 100-pack at Home Depot) lasts 2-3 years outdoors.
For solid fences (wood, vinyl siding, metal), you can either drill screw hooks directly (5-10 minutes, permanent) or weave rope through all grommets and tie off to fence posts (15-20 minutes, removable).
Hanging Between Posts or Poles
Suspending a banner between two poles requires flexibility. Rope alone will work initially, but nylon stretches 15-25% under load as temperatures swing. You’ll come back in a week to find a saggy mess.
Bungee cords solve this. Thread bungees through each grommet, hook the ends to your poles, and adjust until the banner sits flat with slight tension. Installation takes 10-15 minutes.
For installations lasting longer than 3 months, combine rope with bungee cords at the corners. The rope (1/4″ solid-braid nylon, about $0.30/foot) handles weight while 12″ bungees at each corner provide give.
Choosing the Right Banner Material
Not all vinyl is created equal. The weight (measured in ounces per square yard) determines durability:
- 13 oz vinyl: Standard outdoor. Handles around 80% of applications, lasts 1-3 years, costs $3-5/sq ft
- 18 oz vinyl: Heavy-duty. 40% thicker. For high-wind permanent installations, a 3-5 year lifespan. $5-8/sq ft
- 9 oz mesh vinyl: Perforated for wind resistance. Allows 30% of wind to pass through
Compared to fabric alternatives, vinyl remains the top choice for outdoor durability because it resists moisture, holds up to UV exposure, and cleans easily.
But here’s what most guides won’t tell you: for genuinely windy locations like coastal areas, open fields, or building faces above 3 stories, mesh beats heavy vinyl every time.
How to Hang a Vinyl Banner on Brick Without Drilling
Brick surfaces are notoriously annoying if you can’t drill. Renters, historic buildings, and temporary installations under 6 months all face this problem.
Using Brick Clips for Damage-Free Installation
Brick clips are the solution most people don’t know about. These spring-loaded clips grip the lip where the brick extends past the mortar, holding up to 25-30 pounds per clip without drilling or damage.
How do I hang a vinyl banner on brick without drilling?
Use brick clips, which are spring-loaded metal clips that grip the lip where the brick protrudes past the mortar. Each clip holds 25-30 lbs without drilling, adhesive, or wall damage. Position one clip at each grommet location, then hang your banner. Installation takes 5-10 minutes. OOK Brick Clips ($3-5 each at Home Depot) or Amazon Basics Brick Hangers ($12-15 for 10-pack) both work well.
The catch: brick clips only work when bricks extend past the mortar. Flush mortar joints (common in modern construction) won’t give the clip anything to grip.
Heavy-duty outdoor adhesive hooks (Gorilla Heavy Duty Mounting Tape, $8-12, or 3M Command Outdoor Hooks, $10-15 for 4-pack) work on smooth brick. Clean thoroughly with rubbing alcohol and wait the full 24 hours, not the “1 hour” the package suggests.
When Drilling Into Mortar Makes Sense
For permanent installations lasting 2+ years, drilling into mortar (never the brick itself) gives you the strongest hold. Mortar is softer, easier to repair, and cracked brick compromises structural integrity.
You’ll need: hammer drill with masonry bit ($40-60 or rent for $25/day), 1/4″ masonry bit ($5-8), masonry anchors ($6-10 for 25), and #10 screw hooks ($6-10 for 25). Process takes 20-30 minutes.
The honest assessment: if you might remove the banner within 2 years, don’t drill. Repair costs ($15-30 in mortar patch plus 30-60 minutes of work) outweigh any convenience.
How to Protect Outdoor Banners from Wind Damage
Wind destroys more outdoor banners than rain, UV, and temperature combined. In our experience, roughly 60% of premature failures trace back to wind damage.
Why Bungee Cords Outperform Rope
When wind hits a banner, it acts like a sail. A 3×6-foot banner in 25 mph wind experiences 30-40 pounds of force concentrated at your grommets. Strong gusts create sudden tension spikes that can rip grommets right out.
Rope doesn’t stretch meaningfully, maybe 3-5% under load. When a 30 mph gust hits a rope-hung banner, all force goes straight to grommets. Peak force spikes 3-5x higher than average load.
Bungee cords stretch 50-100% of their resting length. That same gust causes the bungee to extend 6-12 inches, absorbing energy gradually instead of instantly. Peak forces drop by 60-80%.
This isn’t theoretical. We’ve seen banners hung with rope shred in 35 mph winds that identical banners hung with bungees survive without damage. If your banner is going outdoors, bungee cords aren’t optional.
Mesh Banners vs. Wind Slits
Wind slits are intentional cuts in banners that allow air to pass through. The theory sounds good, but industry testing shows wind slits reduce load by only about 10%, and they weaken the banner structurally while making your graphics look like Swiss cheese.
Mesh banners work differently. Instead of cutting holes in solid vinyl, mesh is woven with tiny perforations (70% solid, 30% open) throughout. Wind passes through everywhere, reducing load by 30-40%.
Our take after installing thousands of banners: skip wind slits. If wind is a serious concern (average speeds above 15 mph, or gusts above 30 mph), go mesh from the start.
When should I remove an outdoor vinyl banner?
Take down outdoor banners before predicted sustained winds over 25-30 mph, heavy snow, or ice storms. Taking a banner down for a storm (10-minute job) then rehanging after costs nothing but time. Replacing a shredded banner costs $75-300.
Troubleshooting Common Banner Installation Problems
Even properly installed banners develop problems. Here’s how to fix the issues we see in the majority of service calls.
Banner sagging in the middle: The cause is almost always uneven tension. You’ve secured corners but not intermediate grommets. The fix takes 10-15 minutes: add attachment points using the grommets along the edges. For a 6-foot-wide banner, you need at least 4 top attachment points, not just 2.
Wrinkles that won’t flatten: If you installed the banner while wrinkled, the wrinkles will stay because vinyl has material memory. Remove the banner completely, lay flat on a dark surface in direct sunlight for 30-45 minutes. Heat softens vinyl around 100-140°F and releases creases. Reinstall immediately while still warm, pulling the corners diagonally, corner to corner.
Grommets tearing out: Happens when stress concentrates on too few points. Common causes: not using all available grommets, using rope instead of bungees in windy conditions, or installing too tightly (over-tension creates constant 5-10 lb stress that weakens grommets). Prevention: use every grommet, switch to bungee cords outdoors, and install with slight tension that’s taut but not drum-tight.
Banner shifting: Your knots are slipping. Upgrade from granny knots to square knots or bowline knots that lock under tension, or replace rope with bungee cords that have secure metal hooks.
Safety Considerations
Elevated banner installation causes about 6,000 ladder-related injuries annually in the U.S., according to the Consumer Product Safety Commission. Use the right height ladder. You shouldn’t be reaching overhead on the top two rungs. Maintain three points of contact at all times.
If your installation is above 10-12 feet, over public roadways, or permanent mounting to building structures, hire a professional ($75-200 for most commercial installations). Over-street banners require permits in virtually all North American municipalities; fines range from $200-1,000+ for unpermitted installations.
What Hardware Do I Need to Hang a Vinyl Banner?
The hardware you need depends entirely on where you’re installing:
- Indoor walls: Velcro strips ($8-12) for lightweight banners under 2 lbs; screw hooks with drywall anchors ($10-15) for permanent installation
- Chain-link fences: UV-resistant zip ties through every grommet ($10-12 for 100-pack), with carabiner clips for winds above 25 mph
- Between poles: Bungee cords with hooks ($10-15 for 8-pack), since elasticity is essential for wind absorption
- Brick without drilling: Brick clips ($3-5 each) if bricks protrude past mortar; outdoor adhesive hooks asan alternative
- Trade shows: Retractable banner stands ($80-110) for freestanding displays; bungee cords for booth frame attachment
For any outdoor installation, bring 25-50% more hardware than you think you need. Running out of zip ties with two grommets left wastes 30-60 minutes on a hardware store trip.
How to Extend the Life of Your Vinyl Banner
A quality vinyl banner can last 2-5 years outdoors with proper care, but in our experience, most don’t make it past year one because of preventable damage.
Storage: Roll your banner with the printed side facing in. The ink layer is only about 0.1mm thick and scratches easily. Never fold vinyl banners; creases become permanent after 48-72 hours as the vinyl’s molecular structure realigns. Store in a cool, dry location (50-70°F).
Cleaning: Use mild dish soap (1 tablespoon per gallon) and a soft cloth. Avoid scrub brushes, pressure washers, or harsh chemicals. We see scratched graphics from well-intentioned cleaning at least once a month.
Seasonal takedown: Before predicted high winds (30+ mph), heavy snow, or ice storms, take your banner down. This single habit doubles or triples lifespan for essentially zero cost.
The Bottom Line
Banner installation isn’t complicated, but it requires matching your method to your situation. When you factor in the cost of a quality vinyl banner, spending $30-50 on proper hardware is a no-brainer. Bungee cords for outdoor flexibility. Brick clips for damage-free masonry mounting. Banner stands for trade show speed. UV-resistant zip ties for fences. Screws with washers for permanent indoor walls. And always use every available grommet.
The difference between a professional-looking installation and a saggy mess comes down to three decisions: choosing the right hardware for your surface, securing all attachment points, including intermediate grommets, and maintaining appropriate tension (taut, not drum-tight). Get those right, and your banner does its job for 2-5 years instead of 2-5 months.
Hardware costs and installation times in this guide reflect typical conditions. Your specific situation may vary based on banner size, local pricing, and environmental factors. Always verify current pricing at your local retailer and check municipal regulations before any over-street or building-mounted installation.
Pop49 has manufactured custom vinyl banners for trade shows, storefronts, and events for over 30 years. If you need a banner built for your specific installation scenario, or want advice on finishing options like grommet placement and material weight, our team can help.
More Articles
Golf Skee Ball DIY Guide
Combine golf and skee ball for exciting gameplay! Custom golf skee ball games are perfect for events, offering fun challenges…
Custom Branded Countertop Displays: Maximizing Small-Space Impact
Custom branded countertop displays boost brand visibility and sales in small spaces. Discover how to make your retail impact unforgettable.
Prize Wheel vs Digital Scratch and Win
Compare digital scratch cards and prize wheels. Discover which tool boosts engagement better and how to control prize odds with…